
Creating a cartoon version of people is very easy to do. You
can use various softwares such as Corel-draw, illustrator or Photoshop. All
will work but the tools used in doing this may differ from one software to the
other. I am great with Photoshop, so I decided to use it to create the illustration.
These are
the procedures I used in creating the work
1. Create
a New document. Go to file choose New and set the size to any size you prefer

2. Drag
the image from your folder and drop it on the workspace

3. Now
let’s start tracing. Zoom in to the face of the person. Take the pen tool and
start tracing the picture

4. After
tracing, create a new blank layer. Go back to brush tool. Select hard edge and reduce size to (3-5 points). After that, select pen tool. right click and select
stroke. When a dialogue box appear, select brush tool instead of pen

·
5. After that, click ok. After stroking, right
click and delete path (make sure you are still using the pen tool

H 6. Hide
the picture to see your stroke. Just like this

7. Now,
we are going to trace other parts of her body. Now show the picture and Trace these
parts like we did for the outline. After that, create new layer, choose pen
tool and stroke. Use this procedure to trace all the various part of the
person. You will end up with something like this

8. Merge all the stroked layers as one. Now, we
start adding colour to the image. To do this, one, create a new layer and
change the blending mode to multiply. With this blend mode, we can easily see
the strokes of the illustration even when we colour on them.
9. Now
select the brush tool, choose colour and start painting the face of the
person.
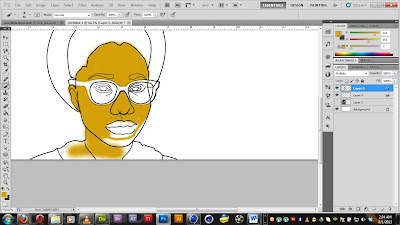
10. After
painting the face, create a new layer, change the blend mode to multiply and
start painting her spectacle.

11. Now
create a new layer, change blend mode to multiply and lets paint the lips and
eyes of the woman.

12. Now
let’s paint the hair of the lady. Create a new layer, change blend mode to multiply
and lets start painting her hair and eyebrow

13. Now
select and paint the hat and dress the same way we painted the rest of the
body. Final work should be like this.

14. Now
let’s start adding tones to the illustration. To do this, Place the original
picture by the side of the illustration like this

15. The
tools used in creating the dark and light tones are Dodge and Burn Tools. To darken
the tone use Burn tool, to lighten the tone, use dodge tool.

16. Let’s
start shading. Select the face layer, choose burn tool (reduce exposure to 15%)
and start shading the face. Shade the face according to the real picture.

17. After
adding dark tones to the face, let’s add light tones to shinning parts of her
face. To do this, select the dodge tool and start shading high tones of her
face according to the picture
18. After
adding tones to the work. Merge them all and Reduce saturation with hue and
saturation. Go to Image – Adjustment- Hue and Saturation and reduce saturation.

19. You
can finalize this by adding gradient background to the illustration. Then you
are done with the illustration.

·
If you love to see more of my blogs and
tutorials, follow my page on facebook, pinterest, behance, youtube, Linkedin and twitter for more updates. thanks